Featured

Millet Bread Loaf (Gluten-Free, Vegan, Oil-free, Refined Sugar-Free, WFPB)

Oil-Free | Refined Sugar-Free | Whole-Food Plant-Based Looking for the easiest gluten-free bread that’s also vegan, oil-free, refined sugar-free, and made with whole ingredients? You’re in the right place. This Millet Flour Loaf Bread is soft, sliceable, and incredibly simple to make—no kneading, no gums, and no strange ingredients required! When I saw a video for this bread on YouTube, I just had to try it! I'm so glad I did.   Perfect for sandwiches, toast, or slathered with your favorite nut butter, this recipe is a game-changer for gluten-free and whole food plant-based eaters. 🌾 Why Millet Flour? Millet is an ancient grain that’s naturally gluten-free, mild in flavor, and packed with nutrients like magnesium, iron, and fiber. It also happens to make a fantastic flour for baking when used correctly—giving you a tender crumb without the dense texture common in many gluten-free loaves. ✅ What Makes This Bread Special? 100% Gluten-Free – Made entirely with mille...

Peanut Butter, Banana & Oat Dog / Squirrel Treats

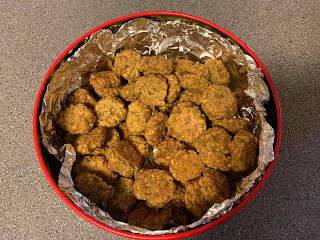
Tired of banana bread? Use your brown bananas to make dog treats. Squirrels also LOVE these, and humans can eat them too! If you’re making this recipe for humans, you may want to consider adding a little maple syrup or honey to the mix. 

Peanut Butter, Bananan and Oat Dog Treats from Jenny's Cookbook


Peanut Butter, Banana & Oat Dog / Squirrel Treats

Ingredients
  • 4 mashed ripe bananas
  • 1/3 cup of natural peanut butter (peanuts should be the only ingredient)
  • a sprinkle of turmeric powder (optional)
  • 1/3 cup coconut flour (optional)
  • rolled oats
 Directions
  1. Preheat your oven to 250F and line a baking sheet or two with parchment.
  2. Combine first 4 ingredients in a large bowl.
  3. Add oats until the mixture is firm enough to roll balls without sticking to your hands too much. Start with 1 cup and see how it is. 
  4. Use a mini cookie scoop or teaspoon to scoop the mixture and then roll into balls. Flatten slightly on a baking sheet. They don’t spread so you can place them close together. 
  5. You may also press the mixture onto the baking sheet and flatten it into a rectangle. The thinner it is, the faster it will cook. Use a pizza cutter to cut squares before baking. I prefer this method.
  6. Bake for 20-30 minutes until one side is lightly golden, then flip and continue to bake until the other side is golden. Mine took about an hour. If you went with the rectangle you can try to flip the whole thing at once and then break the squares apart for the second half of the baking. Or break and flip one by one. Either way, they need to be flipped. 
  7. Cool on cookie sheets completely and then transfer to a container. The treats will get soft if you place the lid on. I leave the lid off so they remain crunchier. 

Comments

Popular Posts